Ignition system – ACCDI

Features
- ONE hardware for XT125-TW125-SR125/XT200/XT225/XT250/XT350 ONLY for those fitted with AC-CDI.
- Another similar unit is available for XT400/XT550/XT600/SR600/TT600 ONLY for those fitted with AC-CDI.
- Models: 12V/15E/15W/16A/17T/25A/2YE/3YU 15A/15X/15Y 3Y1/3Y3/55V 5Y6/1JL/3HU1/2NY 5Y1/5Y2/5Y3/28E 34L/55W/1VJ/3AJ/43F/47N/49H/2KF/2NF/2WJ1 /2NF/2WJ2/3PW1/3PX1/49M/49N/49R /2WK1/2WK2/3EN1/3TBk/3UW
- Use a simple web browser on any smartphone or laptop.
- Easily select your model through WiFi connection.
- No timing curve to program. Just select your bike in 3 clicks.
- The Advance Timing for each bike is already programmed in the unit.
- No internet access required.
- Rev from 10 to 10,000 RPM.
- Pre-set Rev-limiter.
- Easy start without kickback.
- 1 input for the inductive pickup (VR).
- VR conditioner to extract pickup signal in noisy environment.
- 1 output for the ignition coil.
- Non volatile configuration.
- Kill switch input.
- 1 input for Security switch(es) New !
- Once programmed* it runs with 6Vdc, 12Vdc or even no battery
- * 8 to 18 Vdc power supply is needed for the very first programming.
- Current drain: 30mA – 100mA.
- Protected against reverse supply voltage.
- Dimensions: 75 x 70 x 25mm (2.95 x 2.75 x 1inch) 150gr (5.3oz)
- Strong Aluminum box
- Potted for Electrical insulation, Protecting components from mechanical shock and vibration, thermal shock or Moisture.
- Made in France.
Wiring
Wiring XT125-350 | 12 pins Connector XT125-350
Wiring XT400-600 | 12 pins Connector XT400-600
HowTo wire Sidestand & Neutral switches on XT400/XT550/XT600/TT600
Pickup:
Pickup Polarity MUST be Positive then Negative.
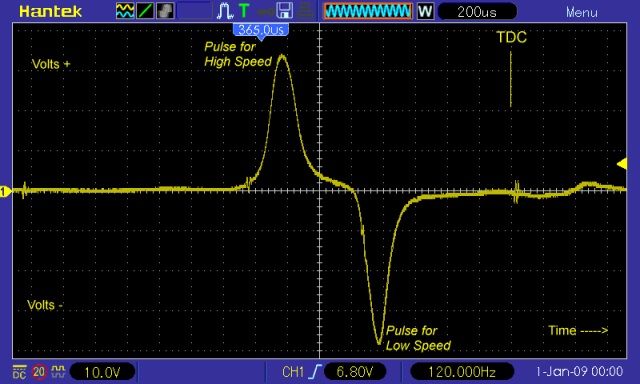
Check the polarity of the pickup (Negative going then Positive/(I call it NP) or the opposite PN: Positive going then Negative) with a Needle galvanometer (in milliAmp position) while kicking.
If the polarity is Negative then Positive(NP) then swap the wires to change the pickup polarity !
HowTo setup
To program the ignition, please Print and follow this procedure: Setup & Troubleshoot.pdf
No need to hook the ignition to the bike for this step, it can be done on the workbench.
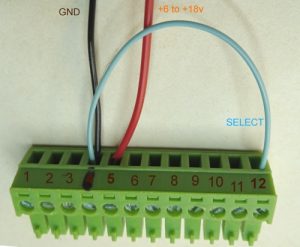
The 12pins connector has a marker trace on pin4 which is Ground. (Pin1 is close to the Led)
1) Connect a Black wire from connector pin4(gnd) to the black plug of a 12v battery. (Ground)
2) Wire a bridge between pin4(gnd) and pin12(Select).
3) Connect a Red wire from connector pin5(+12v) to the red plug of the battery (+12v) to power up the ignition.
4) Led blinks 5+5 times while a WiFi Access Point named “transmic_ign” shows up on you laptop/smartphone.
5) Connect to SSID “Transmic_ign“. (If a password is asked, use “password”)
6) Open up http://192.168.4.1 (Avoid Chrome that automatically switches to https)
7) Pick your bike then click “Send”:
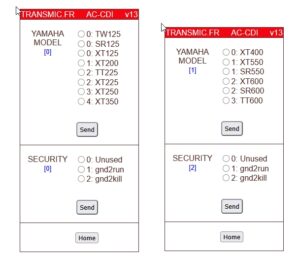
That’s it!
Timing curve for each bike is already programmed in the unit.
8) Power off the ignition box.
9) Remove the bridge from pin4 to pin12 when setup is done.
Diagnose with LED.
XT125-400: As soon as a pickup signal is detected, the Led flashes at each rotation.
XT550-600: Led is triggered by the 36° pickup only. Pulses from 12° pkp don’t turn on the led.
– When the Maximum RPM is reached, the led turns off. If minimum RPM is reached, led turns off.
– When Security input is triggered, the led stays steady On.
– When the box starts in SETUP Mode : Led blinks 5 times fast, 2 seconds off, blinks 5 times fast again, then flashes once every 5 seconds.
The led flashes briefly when data reaches the box through WIFI.
ADVANCE CURVES.
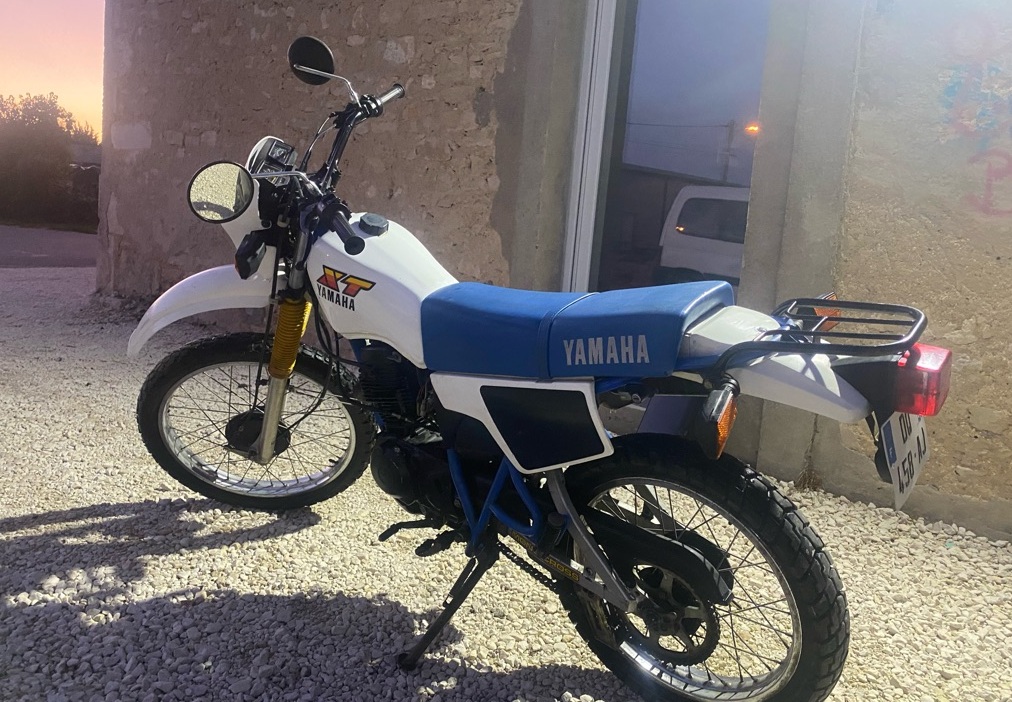
PHOTOS.
XT125 – 12V – 1989 + ACCDIv11xt125

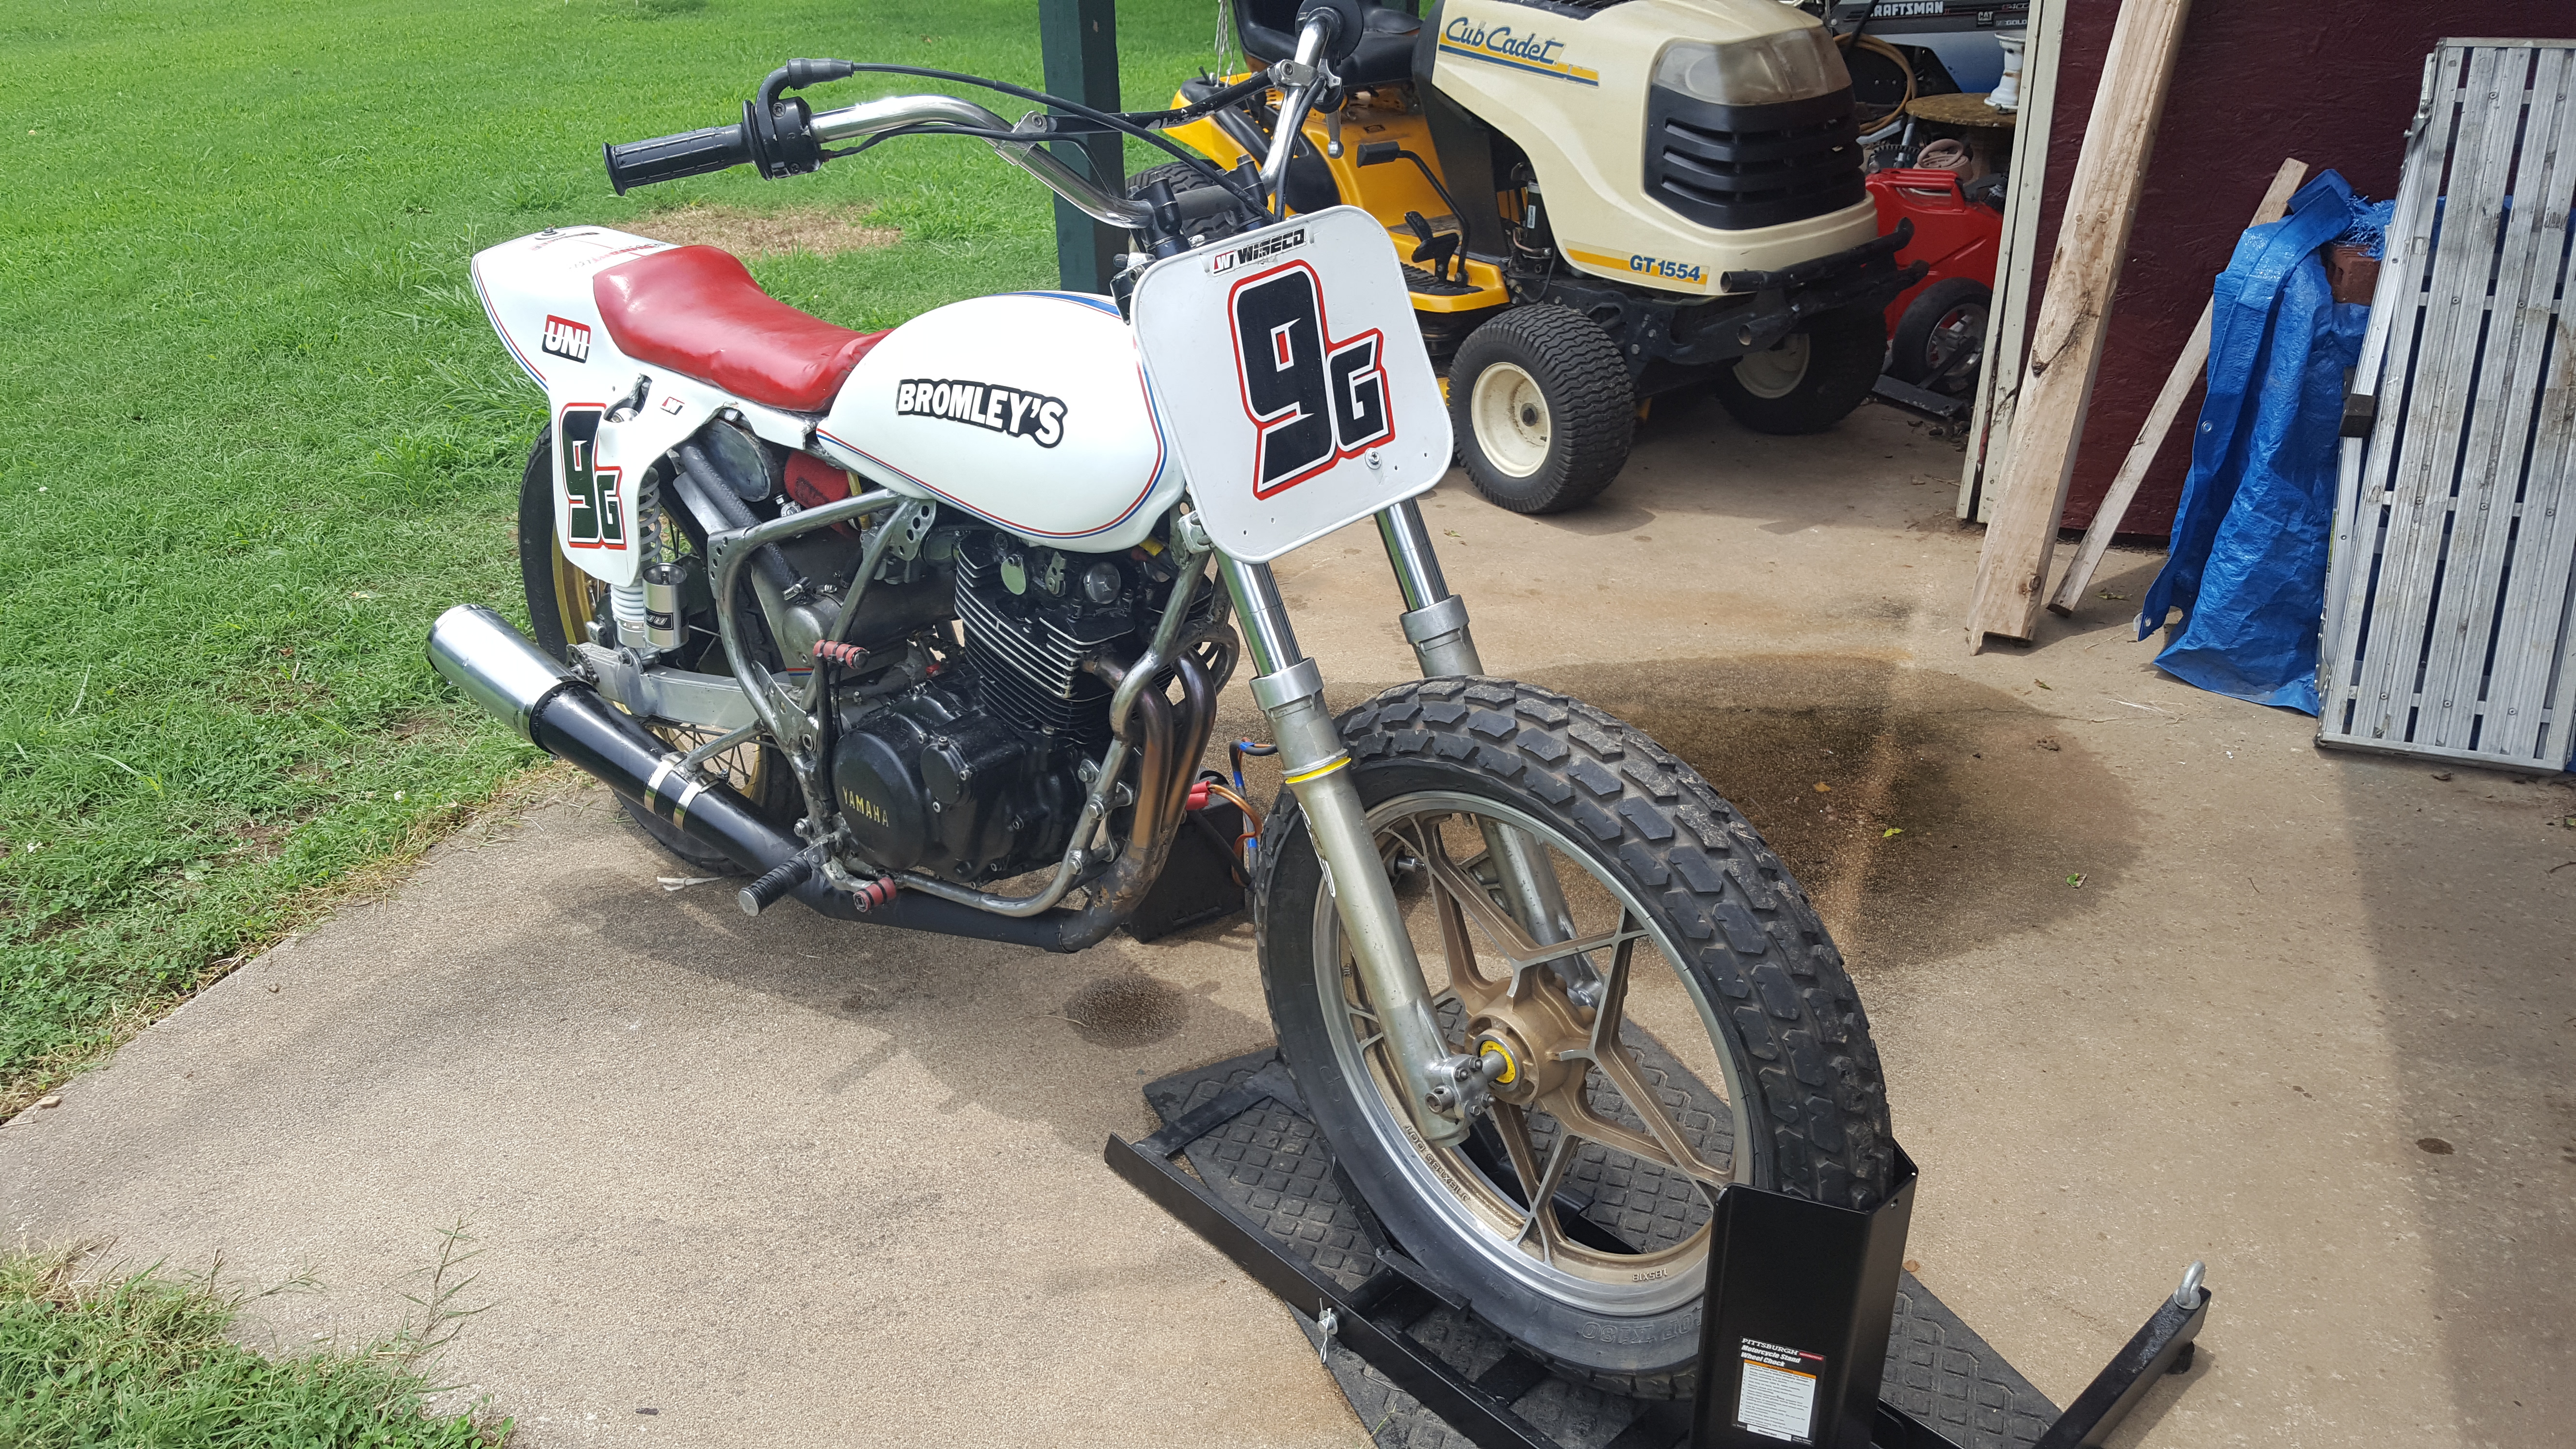
XT600 modded and stuffed into a Penton 250 chassis + ACCDIv11xt550
Hand made seat/fender, headers & exhaust.
VERSIONS
- Version v11r0c0:
- POC
- Version v11r1c0:
- Production
- Version v12r0c0:
- [hard] New processor.
- [hard] Aluminum box.
- [hard] Optional Tachometer output.
- Version v13r0c0:
- [soft] Bug fix.
- Version v13r1c1:
- [hard] Security input.
Hello Thierry, nice work, very useful all products You develop and produce. I live in Colombia and it is dificult for me to test different CDIs and all their configurations. There are always misunderstandings with my clients that sometimes damage different CDIs because dont understand their functioning and easily can damage them in an eyeblind The point is that I”d like to buy your product CDI/TCI Tester v6.2 that is listed in your shop as out of stock. Could you please let me know when will be available again if It will, thank you.
Hello Thierry,
I am very interested in this product but want to check it is ok for my motorcycle before I buy it. I have a very early model Yamaha TT225, the predecessor of the XT225. It was manufactured in 1986 and has the Yamaha 1KH model code.
I believe the engines of these 2 models are basically the same, and therefore have similar timing advance curves. My machine does have an AC CDI set up, albeit slightly different to the later models. The CDI unit taking 2 feeds from the charge coil, one high and one low AC voltage. (Maybe the lower voltage feed just powers the electronics?)
Are you able to confirm that your AC-CDI v11 XT125-400 product is compatible with my motorcycle? If so I will place an order immediately as my original CDI unit is damaged.
Could you also confirm if your unit does need a 12v power supply once programmed and connected to the motorcycle? The statements in your product description does not make this clear to me.
Thanks, Alan.
Hello Alan
Well the timing is not a problem. I’m sure it’s the same as XT225.
I still cannot confirm 100 % as I don’t know about this double charging coil.. !
Does the wiring diagram brings bits of information??
You are certainly right they used the low voltage for electronic. On later models and on mine, the low volt. is made of the high voltage.
That’s why mine can RUN without battery But OFC the setup (just 3 click to pick your bike) need a 12volts for the Wifi programming. I rephrased that hopping it’s clearer now. Let me know.
Th
Hello Thierry,
Thank you for the information and clarification regarding the 12V supply.
I have found a very basic wiring diagram from the internet for this bike but unfortunately the notes are all in Japanese!
I have checked the coil resistance for the high voltage circuit on my bike which is 406 ohms, which is a bit down versus the information I have for later single voltage types. I’m hoping this in still good enough though. Obviously without being able to run the bike I cannot actually measure the AC voltage.
My pickup coil has a coil resistance of 744 ohms which matches that on later machines so this should be OK.
So I am going to order the CDI unit from you and give it a try. Worst case, if it does not work I will look into changing the whole charging system to that of a later bike as I believe they are backwards compatible.
Cheers, Alan.
Hello Thierry,
I received the CDI unit today thanks. Unfortunately I cannot get past the first step of the setup procedure. I have wired up the unit as described but do not see any Wi-Fi network on either my iPhone or my windows based laptop. I have double checked the wiring, including checking the voltage at the wire fixing screws of the connector block.
Please advise any further steps I should take to resolve this.
Thanks, Alan.
Thierry, is the 1984 Yamaha XT600 49N-000469 trigger coil to be considered ‘one’
coil or two because of its green center tap…leaving wht/red as high …and wht/grn as
low and grn soldered in the center (marked gnd).
Pin switch #1, 2, 3,…OFF 4, 5,…ON 6, OFF …this is how I have been running it in the
past but I fear the advance may be failing due to excess heat and vibration.
May be time to upgrade to the new ACCDI 10? I would like 38 degrees (+2 above standard)
to kick in around 3500-4000rpm as I use engine for flat track. Bored to 635cc, 10:1cr, dual
32mm flat slide carbs, custom pipes w/semi reverse megaphone.
Please… I need your input/advice! Thanks in advance…Dan
They are 2 separate coils connected by a center tap.
4 5 ON gives 36° and 12°. Turn up RV1 to lower the advance at HS.
You can lower the advance at HS with 2 5 ON for 21° and 12°
or even down at HS and LS with 2 3 ON for 12° and 3°
For this heavily tuned bike an adjustable CDI would be better.
Specially along with a Dyno !
ACCDIv10 ?? Hey where have you been ? It’s now ACCDIv12 with 2 curves option 🙂
Holy Moly!! Thierry, you are not only genius but a Very Busy genius !! Its been a Long time since I looked at your site and ordered my first ACCDI. …I dont have a clue what version it might be (it has a red LED) but after seeing all
you have available these days, I feel like Im in CDI heaven and loving it! I will place an order for my modded XT600
ACCDI immediately upon hearing your recommendation as to what version you feel would best suit my needs based on my previous post above. You guys are Outstanding !! Include Transmic stickers to add to my flat tracker with my order? Looking forward to hearing from you and, again, Thanks in advance!! …..Dan
LOL
yes pretty busy, I slowly let the snowball rolling…
from my record you have an ACCDI v2.4
Choices for your bike depend on if there is a 12volt battery.
No: ACCDIv27 or ACCDIv11XT (both not adjustable)
Yes: ACCDIv12 (programmable)
if the stator was faulty: TCIv12 or DCCDIv12 (both need batt)
Thierry, No battery. Does V11XT have same advance curve (35deg @4500rpm) as the stock 43F box the XT600 came with? If so, I can do some magic on flywheel key to add a couple degrees. Very excited to know V11 gives a hotter spark than the old my old V2.4. Will order the V11XT Monday 22nd after directing bank to turn on my card for your country for a day. That issue prevented me from completing order today unfortunately.
Thank you, Thierry, for your assistance and making a fine product as I make science out of running Vintage, Super Senior class flat track at 71. …Dan
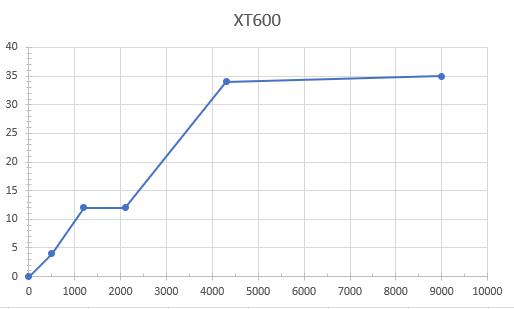
Here’s the curve set for XT600 inside ACCDIv11XT :
Thierry, I received the v11XT and had No problems with set-up having
closely following the instructions on the site. Great product for the cost.
I was hoping to see Transmic stickers for my flat tracker in the order but…
Is timing curve for XT and TT600 the same? Thanks for quick delivery of
product here to the USA. Dan
Hi Daniel,
Sorry I forgot to send stickers with the box. I will send you 2 of them 🙂
Re the adv curve I added them above: ACCDIv11XT_curves.jpg
Thanks for the pic of your flat track bike !
Hello, I have bought your accdixt for my XT 600 2 kf but first of all I have a lot of kick back and when the bike is running I have no flashing led but very important thing I cannot connect on. WiFi to check if the correct curve is already selected.
No led appear on CDI ( i follow even the connection with bridge to 4 and 6 but I also tried with bridge between 4 and 12)
Hi, There are some confusions here….!
ACCDIv12 HAS led and setup is done by connecting KILL (pin4) to ground.
Your version ACCDI v11r1c0 XT has NO LED (I’ll add one in the future) and setup is done by connecting SETUP (pin12) to ground BEFORE powering up the unit.
Kick back could come from a wrong connection of the 2 pickup coils (12° pkp goes to pin10, 36° pkp goes to pin7). Read Wiring XT550-600.pdf above.
Hello, i’m sure that the cable are connected in a proper way (White-red at 7 and white-green at 10 and green common at 8) but i almost broke my feet . Now i tried to get wifi but is not working(bridge from 4 to 12 , connected to ground ad after that i connect 12v to 5 but no wifi connection appear on pc)
Wifi: Read the setup & troubleshoot.pdf above than give me result by PM.
kick back : the very first rotation is supposed to be 800rpm. So kick fast. If you kick slowly you’ll have kickback.
I am so sad because you don’t reply me and also is not possible to setup.
So i don’t know how to do, probably
i will send you back.
That seems really dishonest to me!
Each of your questions has a quick response here. Just look above.
To avoid flooding this comment section, I asked you to follow the troubleshooting sheet and email me the results, but you didn’t do either !
Send the CDI back.
Sorry but I have seen only now your reply.
I will give you a result as soon as possible
Hello Thierry,
quick review on the product – I absolutely love it.
last year I have bought the AC CDIv11 for XT600. Beginning of this year I have rebuilt an 3TB engine to install it within my 34L frame. I have also taken the chance to install this CDI. The wiring is easily done and although I was concerned about the fixation of the single cables on the green connector, it holds them really good. Based on some comments I was also concerned about kickback but that was absolutely unfounded. The ECU is just working great.
Packaging seems to be a problem since the position of the connector limits the options. I ended up placing it on the air box, cutting and closing the connection for the engine ventilation (not needed in my case) with the cables pointing downwards. Currently fixed with velcro tape.
From design point of view the postion of the connector could be better but I saw that AC CDI V14 has already improved.
There is no input for sidestand switch but on 34L not necessary since there is none. I will most likely buy another one for my 2KF then I will think about a logic between killswitch and sidestand switch.
The CDI works as before, so no 12V connection is necessary if it is pre configured. Despite that since I had a spare switched B+ it is connected to 12V.
And that is currently my only concern. What if the cheap regulator breaks, the voltage is uncontrolled rising – is the ECU protected or would you recommend to disconnect it from 12V ?
I highly recommend this product, really well engineered.
Thank you very much Stefan for this feedback and kind words. I’m glad ACCDIv11 reached your expectations.
About points that could be improved:
>Packaging
I’m currently working on the hardware in order to change the packaging and use the same alu box and connection as in TCI or ACCDIv14
>killswitch and sidestand
You should be able to use the same logic as for ACCDIv14 and connect the output directly to kill input pin6: https://transmic.fr/wp-content/uploads/2024/03/Securite_bequille_XT-TT.pdf
>is the ECU protected?
The ECU can handle 24volts max but a faulty regulator gives much more!
So it’s far safer to disconnect the +12v
BR
My CDI on my 1981 Yamaha XT 250 (3y3) is broken. Since the original Yamaha one is no longer available new, I bought a used one. But that one doesn’t work either. The bike ran for a while with a non-original CDI, but it didn’t work very well. Therefore, I’m looking for a CDI that works properly. If I buy your CDI, I’m not sure if I can get the configuration right for my bike. Is it possible to buy a pre-configured CDI for my bike?
Features
Easily select your model through WiFi connection.
No timing curve to program. Just select your bike in 3 clicks.
1 timing curve for each bike already programmed in the unit.
As described, there is no special configuration to do, just select your bike in the menu and you’re done!
Hello I have a Yamaha XT350 from 1987 and I am buying this tonight, could you tell me if there is a specific ignition coil that works better with this than others or it’s all the same, as I’m buying an ignition coil and cable too. Thank you hope it all works out with it.
Hello,
You can refer to “Coil” section at https://transmic.fr/accdi14#coils